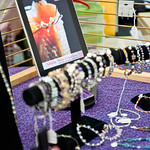
 This weekend I setup an older iPad with as cheap, easy digital signage for Firefly03 to use at a local craft show. These are simply images copied to the iPad's Camera Roll then displayed through the iPad's "Picture Frame" mode. It's pretty cheap all the way around, especially if you already have the hardware. This technique could work very well for all sorts of Geocaching events. At our Cachercon event a couple years ago we setup a PC (connected through the hotel's WiFi) to mine tweets about the event and display them for the attendees as they checked in. Many event photographers will use a wireless card for their cameras to send images to a laptop projecting images from the day's activities while they're still shooting. This type of digital signage can be entertaining and informative. There are so many great ways to use these devices to supplement a caching event.
For those interested in attempting the slide show option on an iPad as I did, here's all you'll need to do:
- Create images at either 1024 x 768 px for the iPad/iPad 2/iPad mini, or at 2048 x 1536 px for the iPad 3rd or 4th Generation. Make sure they're all the same orientation as you'll not want to be rotating the tablet during the show. For mine I chose tall to better fit the subject.
- Transfer the images into Albums on the iPad. This can be done in a variety of ways, most commonly using iTunes. For mine I used DropBox as it made the process pretty simple and didn't require syncing (which in this case the iPad wasn't syncing to my account). For that I simply copied the images to the Camera Roll, then added them to a new Album on the iPad.
- Configure "Picture Frame" as a way to limit user interference. Go to the "Settings" app and select "Picture Frame" from the top level menus on the left. Select the "Dissolve" transition for digital signage ("Origami" might look cool if you're showing just photos). Set the "Show Each Photo For" to at least 5 seconds if you'll have text on the slides, but you might need longer delays between image changes. Turn off "Zoom in on Faces" as this might interfere with the images you create as signs. "Shuffle" can be nice but means the order of the slides will change. Finally select which ablums will be included in the "Picture Frame" show.
- Go to the lock screen and tap the slide show icon. This locks out the slide show options and doesn't exit with a tap of the home button. I'd also suggest setting a passcode as that will prevent guests from exiting the and playing with the iPad.
How have you repurposed old or existing electronics for Geocaching Events?

No comments:
Post a Comment